
Motion Vectors
TaskThis set of Tutorials addresses Motion Vectors, what they mean, how to render them.
Motion Vectors are supported by many RE:Vision Effects tools.
How to use V-Ray Velocity pass with RSMB
Tutorial describing how to set up V-Ray Velocity pass with RSMB in After Effects and Nuke.
Thank you to Aleksandar Kasabov at Chaos Group for this tutorial.
 https://support.chaos.com/hc/en-us/articles/4409172492817
Arnold Motion Vectors Settings
Arnold Motion Vectors settings for our tools with example using After Effects.
This was done with Arnold in Maya but settings should be the same with Arnold in C4D, 3DS Max, Houdini etc...
MV out of Maya with Arnold
Maya now ships with Arnold as renderer. This tutorial reviews the motion vector shader they made to support our products.
Motion Vectors out of Maya using Arnold rendering
This pdf documents Maya-Arnold to RSMB+Vectors in Nuke. The same workflow applies for other hosts. Download
Guest contributor: Alan Boucek

Using Reel Smart Motion Blur with modo 701 outputs in Nuke & After Effects
A video covering the use of Reel Smart Motion Blur to add motion blur to your images in the post process via the use of motion vectors which modo can output at render time.You can access the sample files including the Nuke and After Effects files here 9bstudios.com/modo70x/CrazyChicken.zip
Special Thanks to Yazan Malkosh 9bstudios.com for providing us with this tutorial. The 3D renderer is Modo luxology.com
Exporting 3d renders out of C4D for our plugins : Part 1 - Motion Vectors and UV Maps
This tutorial shows how how to set up a project in Cinema 4D to get the best results for use with RE:Map UV and RSMB Pro Vectors in After Effects (although you can use other host applications for compositing and some of this will apply to other plugins). A Sample project is included using After Effects.
Special Thanks to Patrick Goski at Maxon.net for creating & providing the C4D sample project and for his support 24/7.
How do I get motion vectors out of my 3D system?
There exists different ways to extract motion vectors from a renderer.
How do I get motion vectors out of my 3D system?
You can extract motion vectors which are compatible with ReelSmart Motion Blur from some host applications by using third-party plugins.
Our tools cannot use the motion vector images unless they represent pixel motion in screen space, so you must extract the vectors from a space in which you still have access to the whole 3D scene.
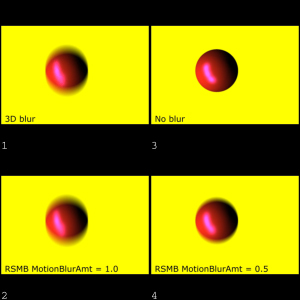
For RE:Vision Effects products, 0.5 of Motion Blur is 180 shutter open if the Motion Vectors represent a full frame interval. We suggest the following simple test, prepared by Dan Rosen of Evil Pictures, to see if you are using a 3D renderer which is compatible with ReelSmart 3D Motion Blur.
You should read all related documentation from RE:Vision Effects, the plugin producer, and the host application before beginning production
We publish methods that are currently available and that don't entail you writing your own motion vector shader. If you have information on other methods, please let us know so that we can update this FAQ (you can email us at: techsupport (at) revisionfx (dot) com).
Press these links for more info:
I'd like to see the math behind your motion vectors
This tutorial explains the motion vectors mapping maths.
We assume that X is positive going from left to right. And the positive Y designates motion going UP.
We assume that X,Y vector information is encoded in the red and green channels of the image. In addition we assume the vector information has been normalized so that both X and Y range from -1 to 1, presumably using some constant value to divide the X and Y component values. We'll call this normalization value the Max Displace value. The blue channel is often ignored.
More about alpha use in the motion vector format
8 bits per channel
In 8 bits per channel, we assume that -1 corresponds to pixel value of 0 and that +1 corresponds to 254. We have chosen to map (-1,+1) to (0,254) because with this scheme we can represent a 0 displacement with a pixel value of 127 (in a scheme that maps (-1,+1) to (0, 255), a 0 displacement value corresponds to pixel value of 127.5, which cannot be represented exactly).
So you can convert floating point motion vectors X,Y to 8 bit red,green values with the following pseudo-code:
// We wish to map (-MaxDisplace, +MaxDisplace) to (0,254)

//First, map (-MaxDisplace to +MaxDisplace) to (0, 1)
float fred = ((x/MaxDisplace)+1)*0.5;

/* clamp values if needed */
if (fred<0) fred = 0;
 if (fred>1) fred = 1;

* assign pixel value *
unsigned char red = fred*254.0 + 0.5;
/* rounding is preferred to truncation, but this is your choice */

* float fgreen = ((y/MaxDisplace)+1)*0.5;
if (fgreen<0) fgreen = 0;
if (fgreen>1) fgreen = 1;
unsigned char green = fgreen*254.0 + 0.5;
/* rounding is preferred to truncation, but that's your choice */
16 bits per channel
In 16 bpc, we map (-MaxDisplace,+MaxDispalce) to (0, 65534) (note: the maximum is 64434 and not 65535). When saving 16 bits per channel the formulae become:
* // First, map -MaxDisplace to MaxDisplace to 0 to 1
float fred = ((x/MaxDisplace)+1)*0.5;

/* clamp values if needed */
if (fred<0) fred = 0;
if (fred>1) fred = 1;

/* assign pixel value */
unsigned short red = fred*65534.0 + 0.5;
/* rounding is preferred to truncation, but that's your choice */

* float fgreen = ((y/MaxDisplace)+1)*0.5;
if (fgreen<0) fgreen = 0;
if (fgreen>1) fgreen = 1;
unsigned short green = fgreen*65534.0+0.5.
Floating point
For floating point images, we map (-MaxDisplace,+MaxDisplace) to (0,1). When saving floating point images the formulae become:
* // First, map -MaxDisplace to MaxDisplace to 0 to 1
float fred = ((x/MaxDisplace)+1)*0.5;
/* clamp values if needed but you should not normally */
if (fred<0) fred = 0;
if (fred>1) fred = 1;

* float fgreen = ((y/MaxDisplace)+1)*0.5;
if (fgreen<0) fgreen = 0;
if (fgreen>1) fgreen = 1
How is alpha used in your motion vectors?
This tutorial explains the need for alpha in motion vectors.
RSMB Vectors assumes that the vector information at a particular pixel is not valid if the the alpha channel in the motion vector image is less than full-on at a particular pixel. Note that transparent source imagery (not motion vector imagery) will be blurred properly, because the alpha for the color source is independent of the alpha for the motion vector image sequence.
It is important to set the alpha to full-on values for the motion vector images where motion vectors are known to be valid. Areas of the motion vector image where the motion vectors are not known (or are known to be bad) should have alpha set to zero or any value other than full-on. It is imporant to categorize each pixel in the motion vector file as good or bad for RSMB Vectors to work properly. For example, when rendering vectors from a 3D animation system it is useful to set the alpha channel to the same alpha channel that is used for compositing the element.
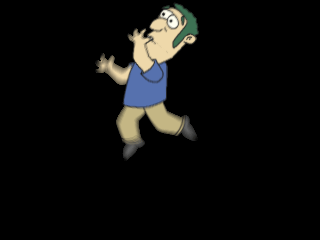
For example, lets say we have the following image created from an animation system.
Let's say we have the following image created from an animation system.

Examples of incorrect and correct setup of motion vector files
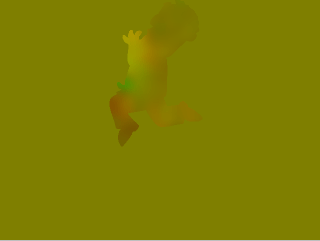
Incorrect Motion Vector creation: Areas of unknown motion vector data set to (0,0) displacement.
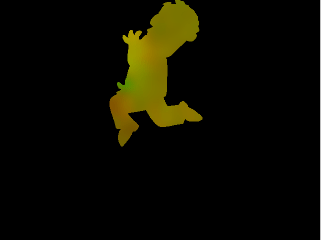
Correct Motion Vector creation: Alpha of areas of unknown vector data set to 0.
Animation blurred with motion vector image above in ReelSmart Motion Blur. Areas with (0,0) displacement do not get blurred. As such, notice the harsh edges around the hand and right foot.
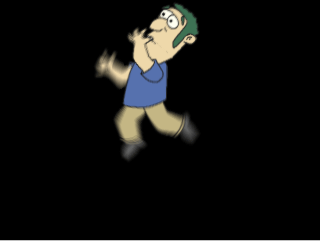
Animation blurred with the vector file. Areas where the vector information not known are now blurred appropriately.
What is the motion vector format for RE:Vision Effects' products?
Motion Vectors Format Explained
Motion Vectors
We use pixel space motion and not 3D or 3D normalized coordinates. That is, each pixel value of the motion vector image should represent the motion of a pixel within one frame time, in image space.
In our coordinate system, the lower-left pixel represents the origin of the coordinate system, (0,0), with positive Y-axis pointing up. That means a motion vector value of (1.0,1.0) represents a motion of a 1.0 pixel in each of X and Y toward the top right corner of the image.
Working directly with pixel motion in screen space eliminates the need for RE:Vision products to need the 3D camera (perspective transform). This obviates the need to reconstruct the specifics of any particular 3D system. Of course it means that RE:Vision products are currently limited to processing in pixel (screen) space.
At any particular frame in time there are two sets of motion vectors to consider: motion vectors from the current frame to the previous frame and motion vectors from the current frame to the next frame. Most 3D systems only allow you to export backward motion (TO the previous frame), therefore have no capacity to make motion for the first frame of your sequence.
We expect motion vectors to be rendered with no antialising; much like zbuffers from a 3D system are normally rendered. For example, if a single sphere is being animated over a black background, the rendered COLOR image at the sihouette of the sphere go towards black when antialiasing is turned on (so you get a nice rounded-looking shape). Should the motion vectors go towards zero (the motion vector equivalent of black) at the silhouette? Most definitely not. As such, motion vector renders from 3D systems should be performed with antialiasing turned off.
The Math
We presume at each pixel that the motion vector is represented by (dx,dy). ('d' for displacement). In a motion vector iimage we assume the x motion is stored in the red channel and the y value is store in the green channel. Each of our products that deal with motion vectors has a scaling factor, called MaxDisplace, that tells the product how to map the range of pixel values to motion vector values.
For example, in 8pc we map the range off pixel values (0, 254) to (-MaxDisplace, +MaxDisplace). For 16bpc images we map the range of pixel values (0,65534) to (-MaxDisplace,MaxDisplace). And for floating point images (where often the color channels are in the range (0,1)) we map (-1,1) to (-MaxDisplace,+MaxDisplace).
More details about the math of our motion vector format
What should the value of MaxDisplace be?
For 8 bpc (bits per channel) motion vector images: Note that 8 bit per channel images should not be used for motion vectors unless there is small motion (not more then +/- 32 pixels of movement in either x or y). As such, you can set the MaxDisplace value to 32 for 8 bpc images.
16 bpc motion vector images: On the other hand, 16 bpc images can fully represent motion with sufficient subpixel resolution for most practical purposes. For example,you can represent motion vectors that have 1024 pixels in x or y motion with 1/32 subpixel precision. A rule of thumb for 16 bpc motion vector files: you can almost always safely set 'MaxDisplace' to 2048. There is the following exception: For images with greater than 2048 pixels on a side, and with motion in the scene of more that 2048 pixels, you should use the following rule of thumb: use the greater of the width or height pixel dimension.
For floating point images: Set MaxDisplace to 2048 (although any positive value will do).
How is the alpha channel of motion vector images used?
The alpha channel represents the coverage of motion; that is, the alpha channel designates the image area that has valid motion vectors. At pixels where there alpha is less than full-on (255 for 8 bpc, 65535 for 16pbc, 1.0 for float), the RE:Vision Effects plugins assume that the motion vectors are not defined.
Note that there is a significant difference between the following cases:
1. not knowing the motion amount a particular pixel (that is, there is no object represented at a particular pixel); and,
2. setting the motion vector to (0,0) (that is, no motion) at a particular pixel.
For example, ReelSmart Motion Blur takes advantage of knowing which pixels contain valid motion vectors. By knowing which pixels contain an object's motion enables our motion blur process in ReelSmart Motion Blur to properly blur the motion outside of an object boundary. The blue channel is most often ignored by RE:Vision Effects products (see each product for details).
How La Maison's Mental Ray plugin works with RE:Vision Effects plugins
Mental Ray shader that can be used to output vectors for RE:Vision Effects plugins
How La Maison's Mental Ray plugin works with RE:Vision Effects plugins
La Maison has graciously provided a free Mental Ray shader that can be used to output vectors for RE:Vision Effects plugins. The shader was initially developed for XSI as an output shader but it has also been used with Maya and 3D Studio Max. You can
download the free shader here.
Normalize, Max Displace, and Target Values
There is a mappping between the "Normalize" setting in the La Maison vector shader and the MaxDisplace setting in any of the RE:Vision Effects products. The Normalize setting in the La Maison vector shader maps to the Max Displace value for all RE:Vision Effects products. Adjusting the Normalize setting also results in adjustments to the Max Displace Value.
Normalize and Max Displace Mapping in lm_2DMV V1.3
- a value of 0 for Normalize translates to a value of 16 for our 'MaxDisplace' value.
- a value of 1 for Normalize transltes to a value of 32 for our 'MaxDisplace' value.
- 2 --> 64, 3 --> 128, 4 -->256, 5 --> 512, 6 --> 1024, 7 --> 2048, 8 --> 4096
- Do NOT use a value less than 0 or greater than 8.
Normalize and Max Displace Mapping in lm_2DMV V2.0
a value of 1000 is a 1000
Target Value in V1.3 and V2.0
Set the 'Target' value of the lm_2DMV shader to 1 (this essentially means "make motion vectors that are compatible with RE:Vision Effects' ReelSmart Motion Blur.")
The La Maison page provides further documentation.
Motion Vectors Out of Maya - video 1 to 4
The following videos Motion Vectors out of Maya is a set of 4 tutorials prepared by Arkadiy Demchenko.
Many of RE:Vision Effects tools support motion vectors inputs including: ReelSmart Motion Blur, SmoothKit Directional, RE:Map Displace, Video Gogh, Twixtor Motion Vectors In.
This process will be useful to RE:Vision Effects users in Shake, Maya and Max Composite, Nuke, Fusion, After Effects, Combustion and others.
01_Basics I. This video explains how to install a special shader to
render motion vectors with Mental Ray.
02_Basics II. In this tutorial we review some theory on how to render motion vectors properly and show a couple of tricks and things to keep an eye on. The tutorials are done in Maya 2009 but will apply to
03_Example I. Simple example scene with an animated spider. Using lm2DMV shader as well as Maya 2009+ passes system to get motion vectors.
04_Example II. Another example scene with a tower blowing up into pieces. Only Maya 2009+ passes system is used in this example.
A set of Maya scene project files to test the content of this tutorial by yourself and compare your results is maintained here:
http://www.revisionfx.com/support/faq...
The 2009 scenes can be uploaded directly in 2011 without issues.
P.S. Keep in mind that Sun&Sky system used in this scene creates a gamma correction lens shader for your camera that needs to be disabled / disconnected if you want to render the scene with lm2DMV shader. Passes on the other hand will ignore it, so no need to bother then.
Arkadiy maintains the blog http://www.sigillarium.com about Maya and his work.
MV Out of Maya 3
MV Out of Maya - part 2
MV out of maya
MV Out of Maya Description
The following videos Motion Vectors out of Maya is a set of 4 tutorials prepared by Arkadiy Demchenko.
Many of RE:Vision Effects tools support motion vectors inputs including: ReelSmart Motion Blur, SmoothKit Directional, RE:Map Displace, Video Gogh, Twixtor Motion Vectors In.
This process will be useful to RE:Vision Effects users in Shake, Maya and Max Composite, Nuke, Fusion, After Effects, Combustion and others.
01_Basics I. This video explains how to install a special shader to
render motion vectors with Mental Ray.
02_Basics II. In this tutorial we review some theory on how to render motion vectors properly and show a couple of tricks and things to keep an eye on. The tutorials are done in Maya 2009 but will apply to
03_Example I. Simple example scene with an animated spider. Using lm2DMV shader as well as Maya 2009+ passes system to get motion vectors.
04_Example II. Another example scene with a tower blowing up into pieces. Only Maya 2009+ passes system is used in this example.
A set of Maya scene project files to test the content of this tutorial by yourself and compare your results is maintained here:
http://www.revisionfx.com/support/faq...
The 2009 scenes can be uploaded directly in 2011 without issues.
P.S. Keep in mind that Sun&Sky system used in this scene creates a gamma correction lens shader for your camera that needs to be disabled / disconnected if you want to render the scene with lm2DMV shader. Passes on the other hand will ignore it, so no need to bother then.
Arkadiy maintains the blog http://www.sigillarium.com about Maya and his work.